This post is also available in: עברית (Hebrew)
The common (mis)conception among non-vegans or vegan newbies is that a vegan diet is very limited culinary wise. Well ,I disagree and actually believe the opposite. First, plant based options are tasty, varied and nutritious, you just need to “open up” to them and step away a bit from the status quo. On top of that, it is actually the so called vegan “restrictions” that are forcing you to get to know new foods and ingredients, as well as new techniques for cooking and baking, that you would likely not have been exposed to otherwise. It is like the saying, that in every challenge we need to look for the opportunity. I do however understand, that collecting this new vegan cooking tips and tricks from books, friends, the web, or the hard core trial and error way might be an intimidating task or just not something right for everyone (especially if you don’t like to spend extra time in the kitchen).
This is where this post adds value: I gathered here all the vegan kitchen “secrets” I know, which means basically everything I learned from here and there (many in the way of trying, failing, throwing and trying again until its perfect) about how to “veganize” foods along the years.
You are more than welcome to add your own tips in the comments, and share this with anyone you think it might add value to.

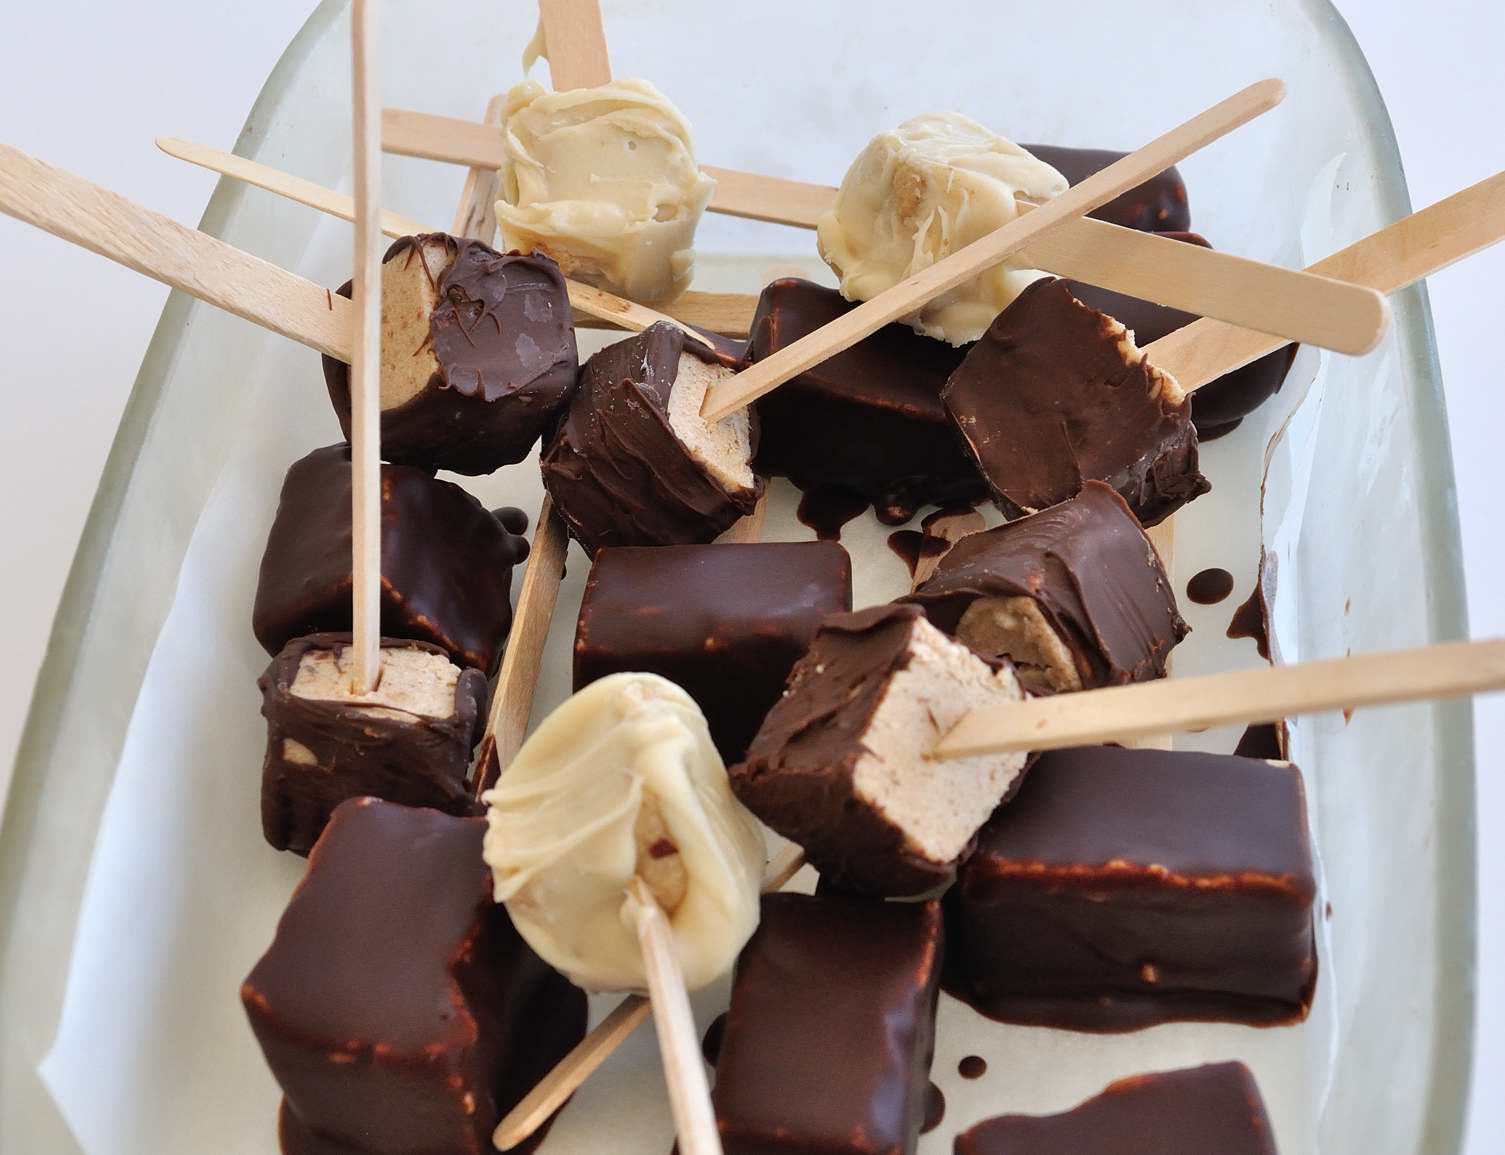
So where should we start? From the dessert! Why? Simply because sweets are my weakness, and because I am truly in-love with ice-cream, and I know many people refrain from going fully vegan mainly because of cheese (which we’ll deal with in a minute) and ice-creams. So ice-cream: the basic vegan ice-cream recipe requires (wait for it…) banana! My apologies to all the veteran vegans reading this, you are welcome to jump to the next paragraph, however I keep getting surprised responses from new vegans or non-vegans about the amazing ability of bananas to create a creamy ice-cream. All that you need to create this magic is just ripe bananas (so you got yourself an environmental friendly solution for excess ripe fruit right here), freeze it in pieces, then puree either in a food processor (or a high speed blender), and that’s it. The frozen banana will create a creamy texture, suspiciously similar to the ice-cream’s texture, and from here on you can really practice your creativity: feel like chocolate chips? Throw some in while blending. Like Halva? Mix in raw tahini and maple syrup. Want to upgrade this to Popsicles? With a peanut butter and chocolate shell? Check out here.

OK, moving on in the ice-cream kingdom, now we want berries ice-cream, a creamy one, no banana taste, in a cone. For this we’ll use coconut cream, that was kept in the fridge for a day, then we’ll take only the creamy part out (and use the liquid for other recipes). The coconut cream is a good base not just for ice-creams in a cone, but also for small cute chocolate covered bite sized ice-cream.
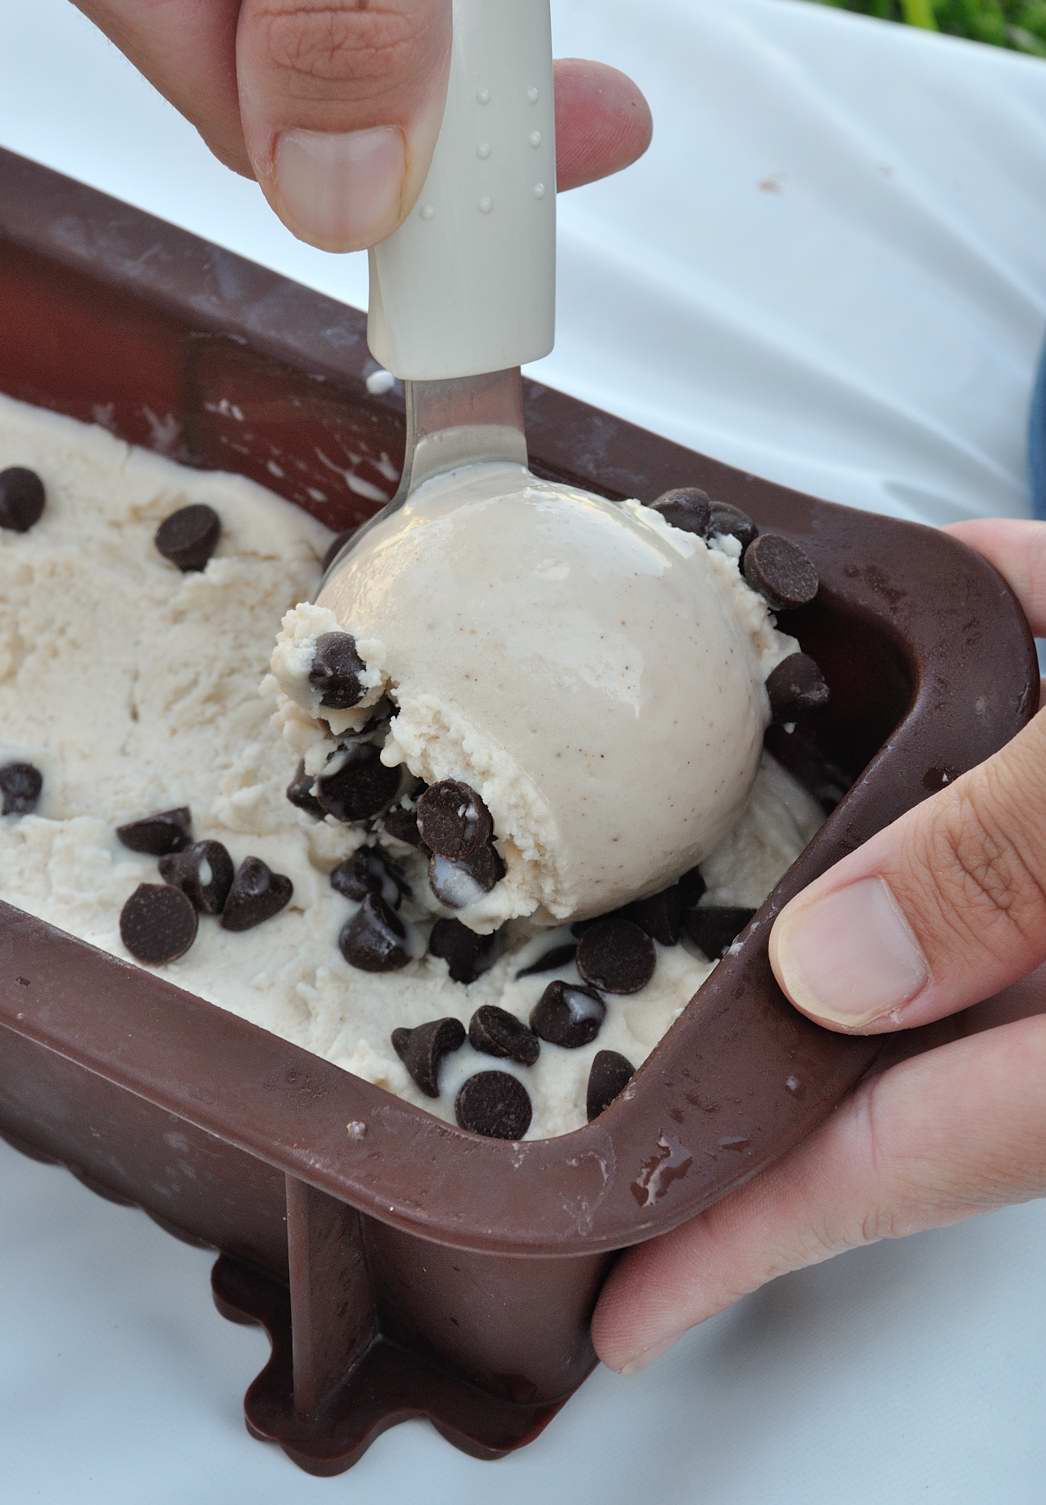
Wait, wait, but I hate coconut/am allergic to coconut/don’t want to include coconut in my diet for any other reason, pick the one you relate to. No problem, go for the nut based ice-cream. It is my favorite option by the way, as I don’t fancy coconut that much, and I like the idea that I can play with the flavors (use different nuts each time to create amazing flavors), it requires only 4 ingredients (that is if you count the water and the salt..), and is amazingly easy to make and so tasty. I know that sounds promising, but even if you are doubtful I urge you to give it a try as it is so good.
If you tried all my recipes and feel like you want to try something else, I recommend you’ll checkout Minimalist Baker’s ice-cream recipes, everything I tried from there was good.
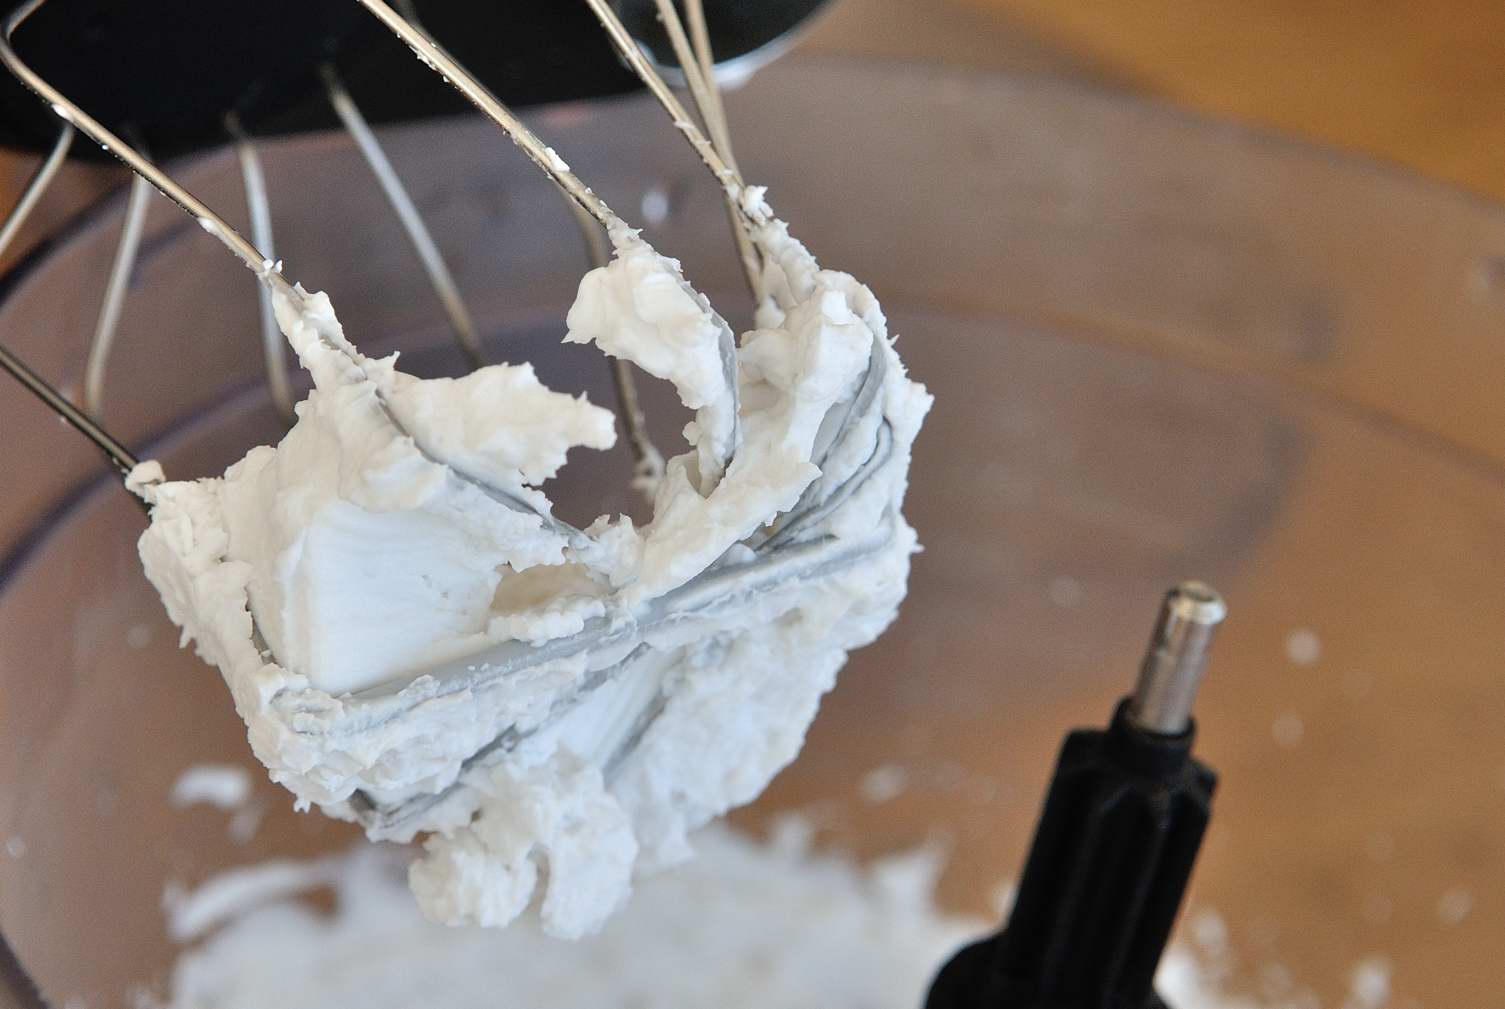
Shall we go on? We talked about coconut milk already, and now would be a perfect time to share that it can also serve as a vegan whipped cream option. So yeah, it’s not perfect, as it isn’t as stable as true whipped cream, and it has some coconuty flavor (well, it is made out of coconut..), but it is a worthy replacement for those who like coconut taste. I do want to clear some confusion about it though: you’ll see different names for coconut products in different places, as it varies from one brand to the other and from one recipe to the other. Some will refer to it as coconut water, some as coconut milk, and some as coconut cream. For most uses it doesn’t really matter, but if you want to make coconut whipped cream you’ll need a coconut water/milk/cream that has at least 17% fat in it, and contains no guar gum or xantan gum (I use Aroy-D brand that comes in a green carton, as it contains no un-needed additives, just coconut and water). So, to whip, place the coconut carton in a cool place in your fridge (by that I mean not on the fridge’s door rather somewhere in the back of it) at least over night and preferably more (especially in the summer). When you’ll open it (gently, do not shake) you’ll notice that the fats and the liquids has separated, leaving a cream on the top and water on the bottom. Scoop out only the cream part (and leave the liquid for uses in other recipes that call for vegan milk). Whip this cream until you reach the consistency of whipped cream (perhaps a bit more dense than the dairy one you know). Many recipes call for instant pudding to whip with, but I don’t use that for nutritional reasons, I just add 2 table spoons of pure maple syrup towards the end of the whipping process, and it is sweet enough in my mind. You can find more details and pictures for this process in this post.
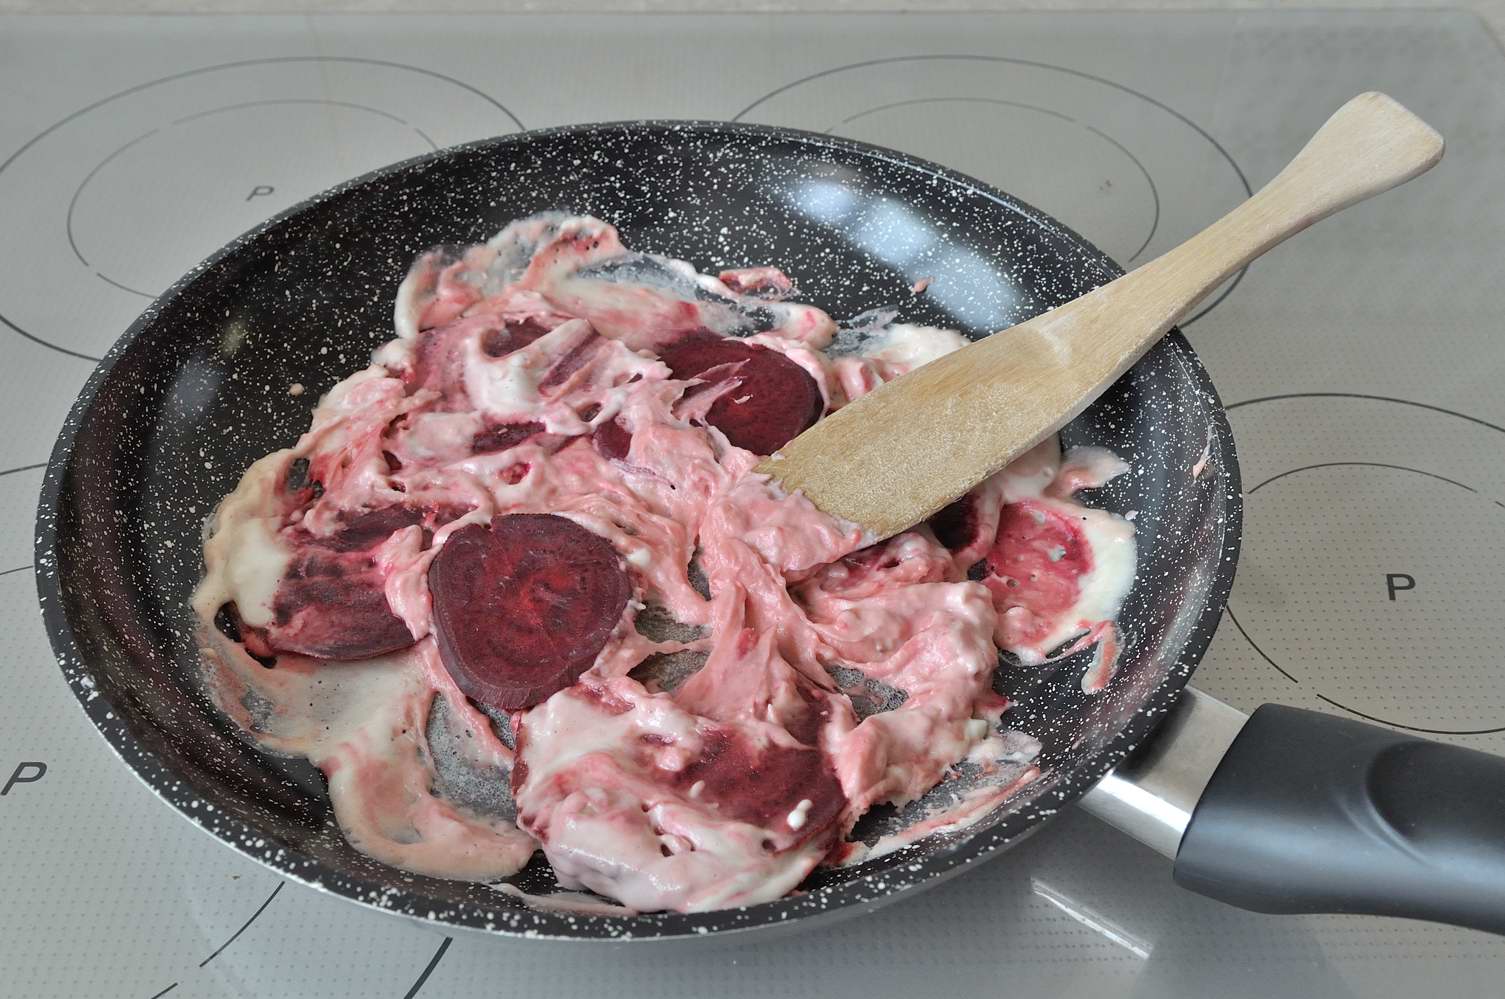
OK, so we have now ice-cream and Popsicles, we have whipped cream also, I guess its time to talk about cooking cream. While you can use many store bough vegan cooking creams, I tend to like making things at home to control the ingredients, especially when its easy. For cooking cream, all you need are some cashews. Soak the cashews in water for 12 hours (or in boiled water for 10 minutes if you are more spontaneous), then strain blend a cup of cashews with about 3/4 to a cup of water (add gradually as needed), until you reach the consistency you like. You can obviously use this cream for recipes calling for it like pasta, lasagna, pies and what not. You can also get creative and use it along with some beats to make a beautiful purple cream and top it on these flour free beetroot raviolis.
While we are discussing cashew wonders, you should know it can also be used to make cheese (much like the cream process), one cup of soaked and strained cashews, throw in the blender with 1/2 a cup water, juice from 1/2 a lemon and some salt, and blend until smooth, then optionally add some herbs to flavor. There’s also the famous almond feta cheese, which is so tasty, and to be honest the vegan cheese scene is blossoming these days and just keeps providing new, rich and creative flavors, so browse the web to be positively surprised. Another little secret has to do with nutritional yeast, if you add them to a gravy, they add richness and make it more creamy. They do have a distinct flavor, which doesn’t speak to all though (personally I don’t fancy them much), so try first.. Some go a step further and claim they contribute to a “cheesy” flavor.
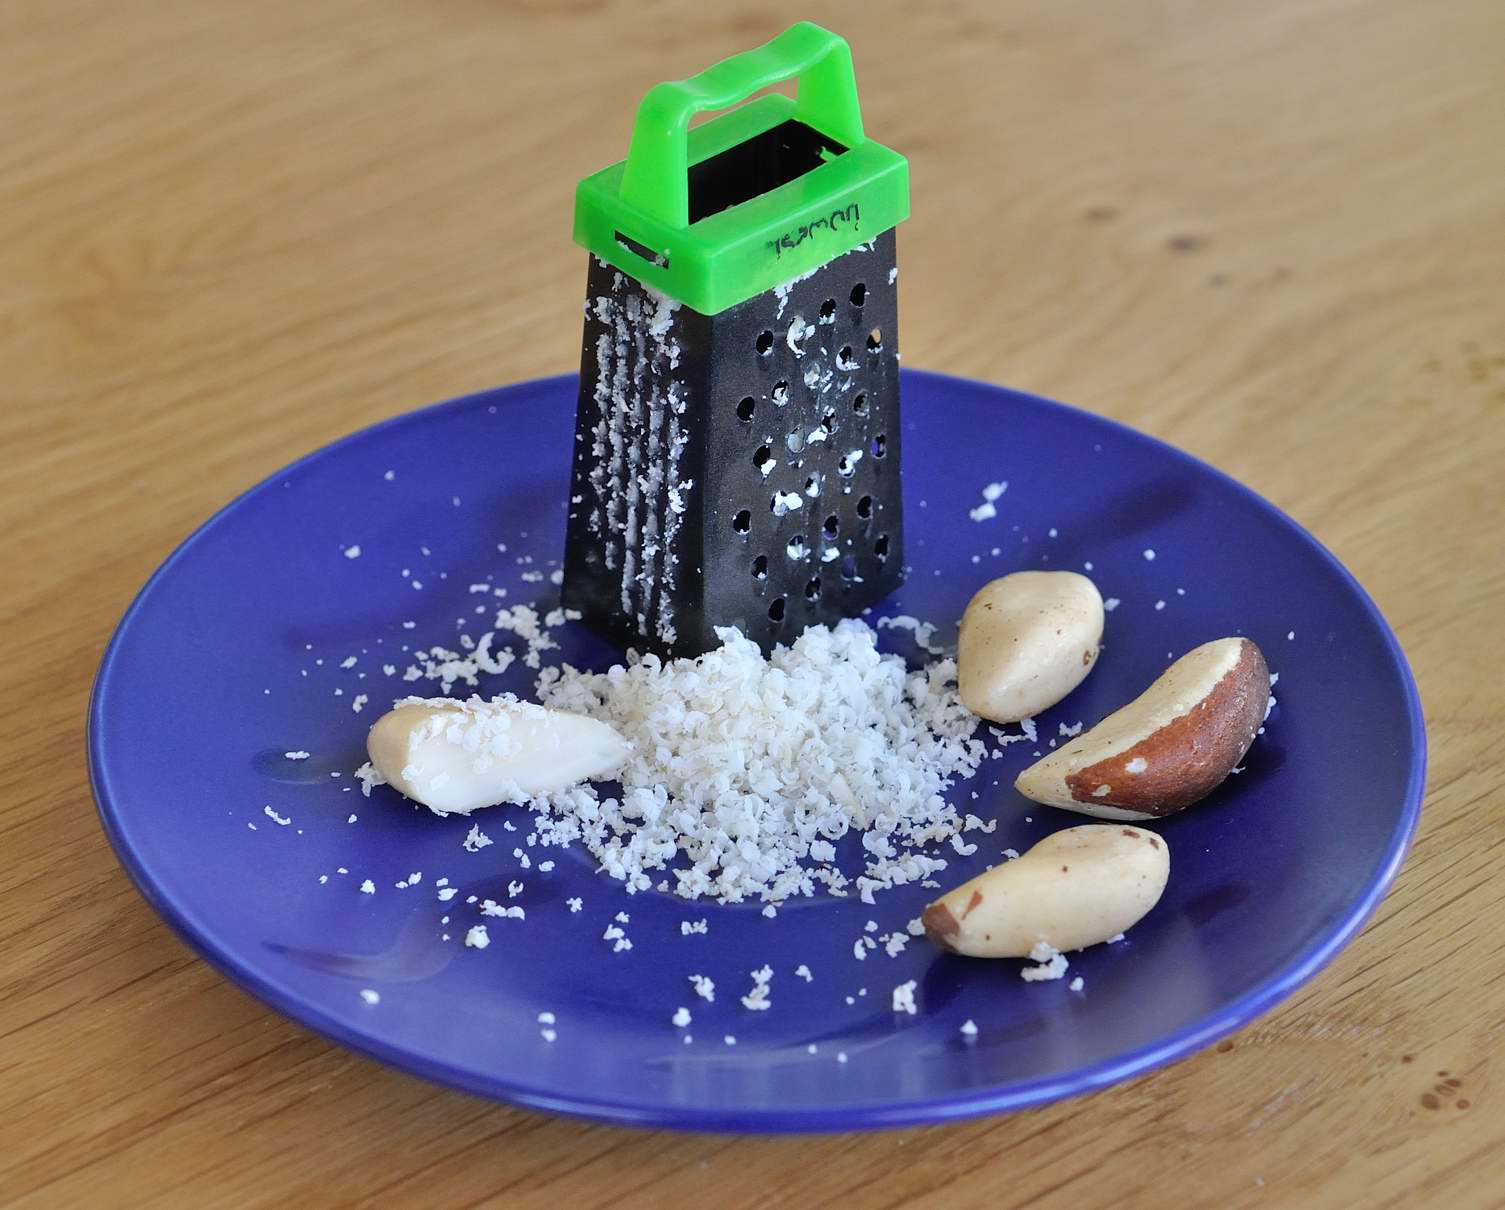
More on the cheese matter, if you like to imitate parmesan, you can use some finely grated Brazil nuts. While they don’t taste like parmesan, they do look like it, and we all know our eyesight can reflect on the taste of our food tremendously.
A few more words on the coconut products, as we can use not only the coconut water/milk/cream, but also coconut oil. Almost every recipe that calls for dairy butter, you can sub the butter with coconut oil, as it has similar characteristics. Some places say you should put 80% coconut oil compared to the butter quantity, but I usually just sub 1:1, though I almost never go for recipes with a lot of butter in the first place anyway.. One thing to know about coconut oil if you are only starting to use it, is that it turns solid (like butter) in temperatures under 24 C, so don’t freak out if you bought a liquid translucent oil then you see it becomes solid white. You can always melt the needed amount in a double pot or in your microwave oven.
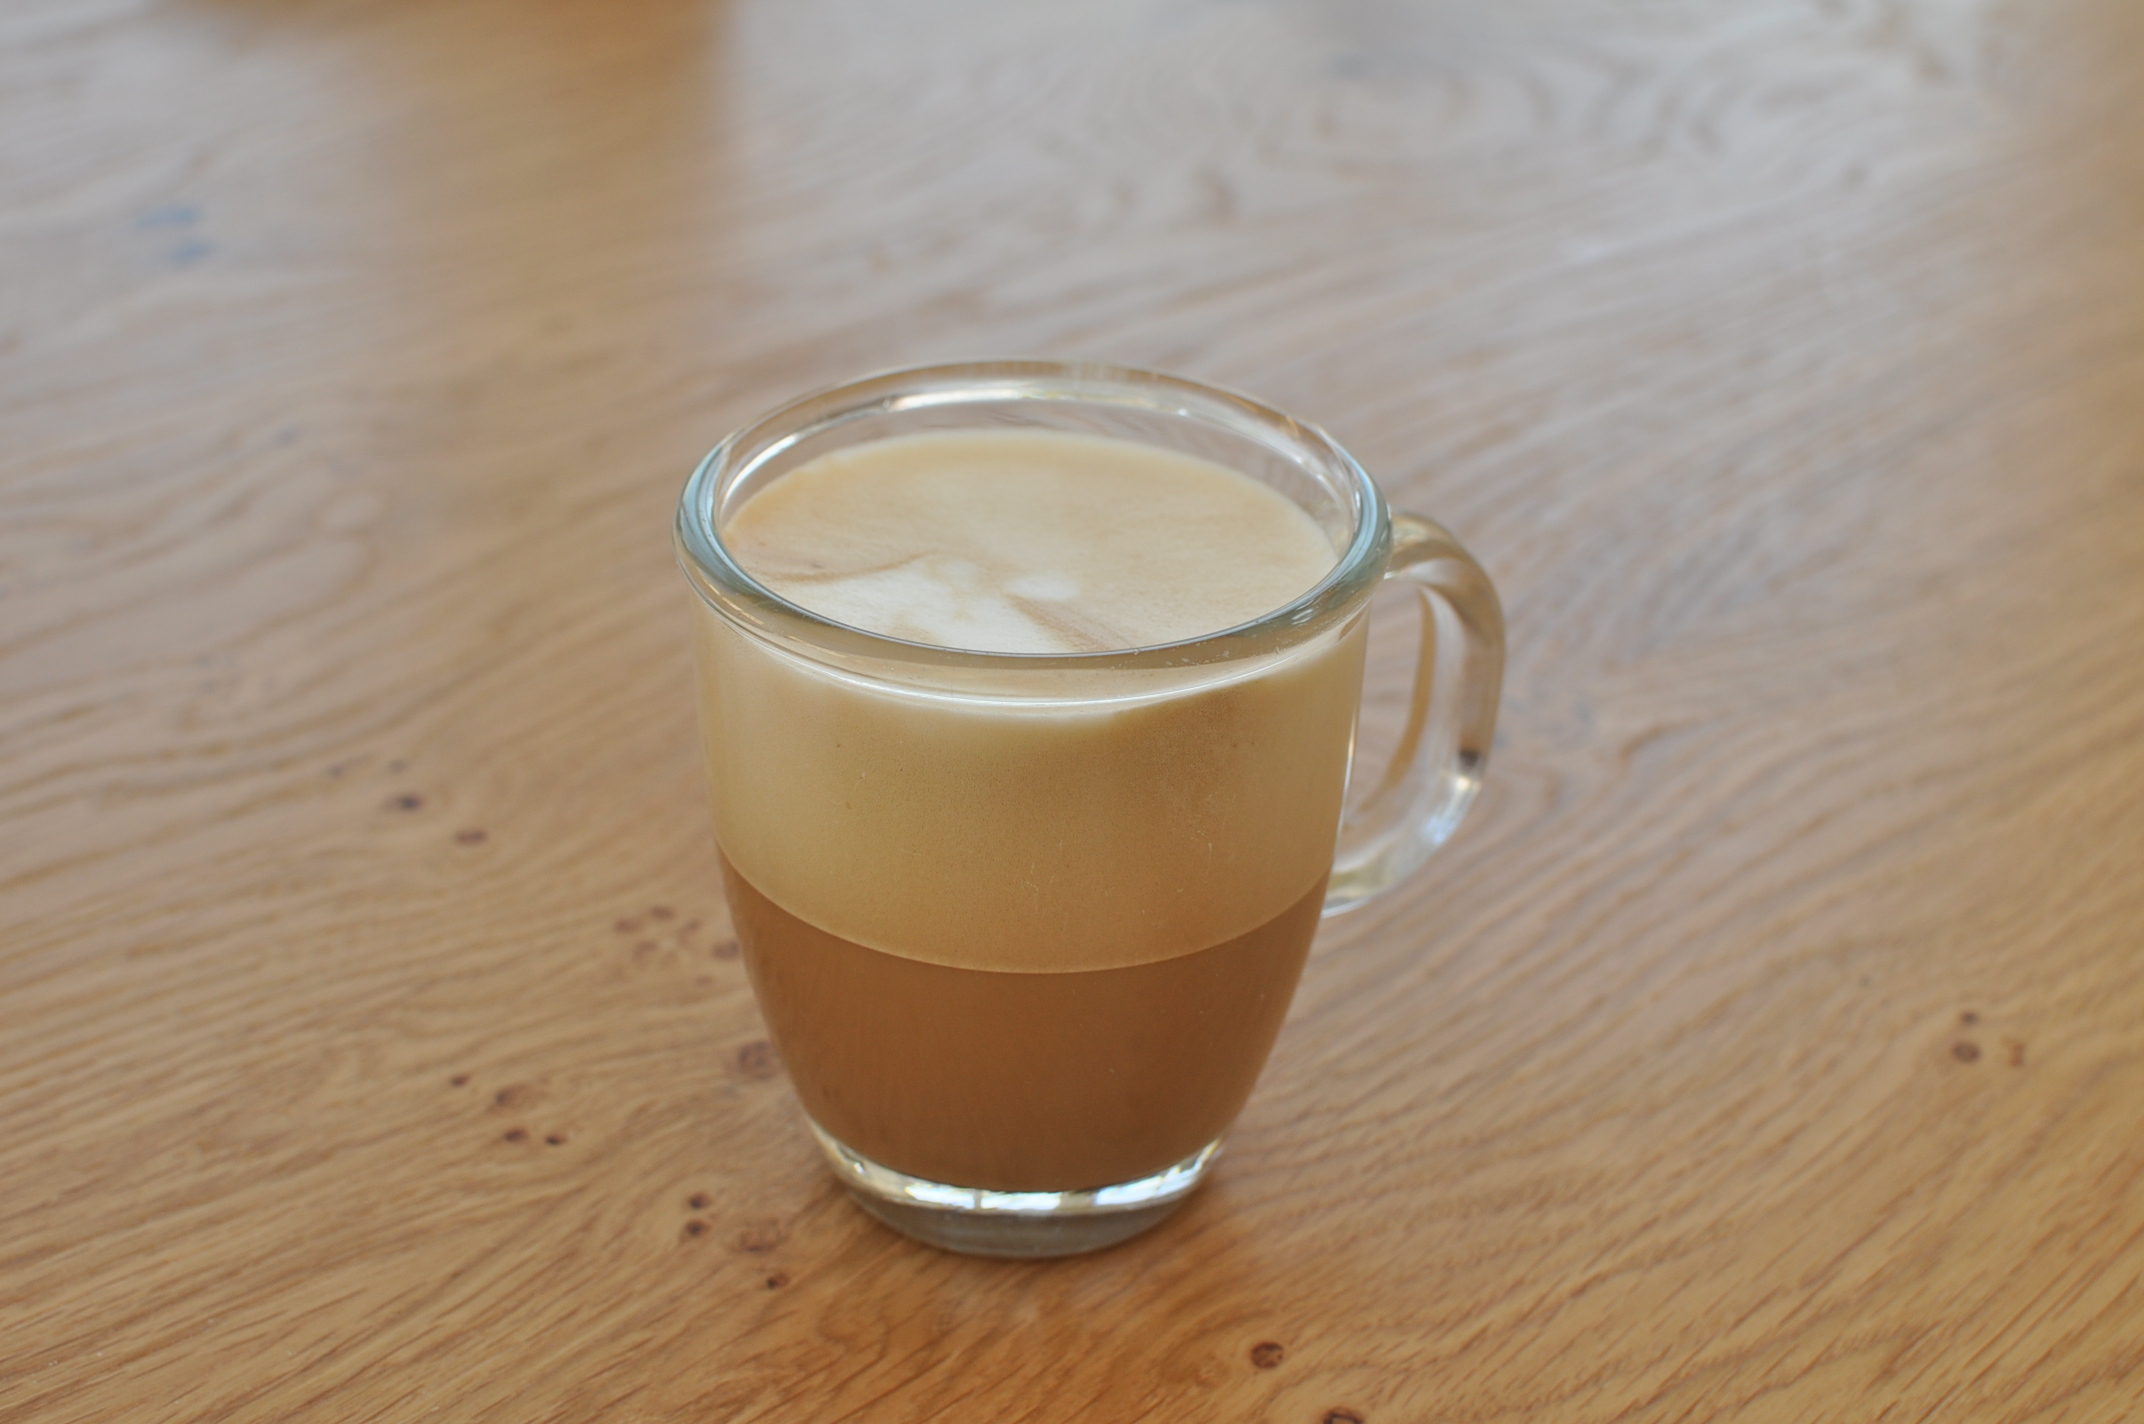
But what will we drink our coffee with? Well’ I am a cappuccino addict, and as one, I admit the coffee’s milk was the hardest thing for me and was the last dairy product I gave up on before moving to fully plant based diet. Problem was I couldn’t stand soy milk, and it is the only one that produces a decent milk froth for cappuccino, but I got used to it and today I actually enjoy it and cannot even smell dairy milk (and more about that in this post). But now generally speaking, there are so many amazing vegan milk options today, among them: soy milk, almond, oatmeal, hazelnut, rice, hemp, coconut and much more. You can find these on most stores today, but you can definitely also make them at home, which is likely better as you can control the ingredients and it is cheaper. Check out this beautiful post for detailed recipes for all kinds of vegan milk options.
Egg substitutes is one of the most discussed topics in vegan cooking and baking even more specifically. How will we eat an omelet? A pie with no eggs? etc.
So you can make chickpea flour omelets, red lentil flour omelets, or a combination of them, as well as oatmeal omelet. A few rules to follow to make your vegan omelet experience better: you should have a good non-stick pan, make sure your pan is warm before you pour in the batter, and the batter should be somewhat thick (more like a pancake batter than a traditional omelet batter).
Regarding scrambled eggs, you can use silken tofu to imitate the look and feel of them.
As for eggs in baked good, here it gets a bit more complicated, (but can be solved!), simply because eggs fill different roles: in pastries they are used mainly for sticking the ingredients together and for leavening, and in mousses/cremes/mayo/etc. it is mostly for emulsification. Each of these roles calls for a different egg replacer, that and more, it makes a difference if your dish is sweet or savory. While there are many substitution options to choose from, you really need some experience here to know what will work best, so my first recommendation would be to start with vegan recipes, such that don’t need to struggle with any substitutions, and gradually, as you gain confidence in baking, start experimenting with the options and see what works best for you. The general guidelines to follow here are: For sticking: One table spoon of ground flax seeds mixed with 3 table spoons of water (also referred to as “flax egg” in some recipes) left aside for 10 minutes is a good neutral taste sub, one table spoon of chia seeds mixed with 3 table spoons of water (also neutral taste), 2 table spoons nut or seed butter (raw sesame paste is great for patties and muffins, so is almond butter, and peanut butter is great for sweet pastries), 3 table spoons pureed beans or legumes, 1/4 cup pureed banana/apple/other fruit. For leavening: 1/2 tea spoon baking soda mixed with 1 tea spoon of vinegar will do the trick, one thing to remember here though is that the chemical leavening reaction starts immediately, so add this only just before you are ready to place the dish into the oven. For emulsification: you can use 1/4 cup pureed tofu, cornflour, tapioca flour etc.
Above an beyond all these egg replacers, the latest revolution in vegan cooking belongs by no doubt to the Aquafaba, or chickpea brine, which is basically just the liquid from canned chickpeas, which are so packed with proteins that they serve as a great egg sub. They can be used to create anything from vegan meringue, to any cake or pastries you like. I haven’t used it yet, so can’t testify myself, but if you need some educated advice on this subject matter, there’s a Facebook group dealing only with this called “Vegan Meringue – Hits and Misses!“.
Vegan mayo is also very much possible: the basic ingredients are similar enough, but it’s the amount of each that makes a difference in the consistency of the final mayonnaise. Combine soy milk, lemon juice and mustard in a blender or with a wand blender for about 30 seconds. While blending, slowly add in the oil until emulsified and it thickens. (Source: Wikipedia).
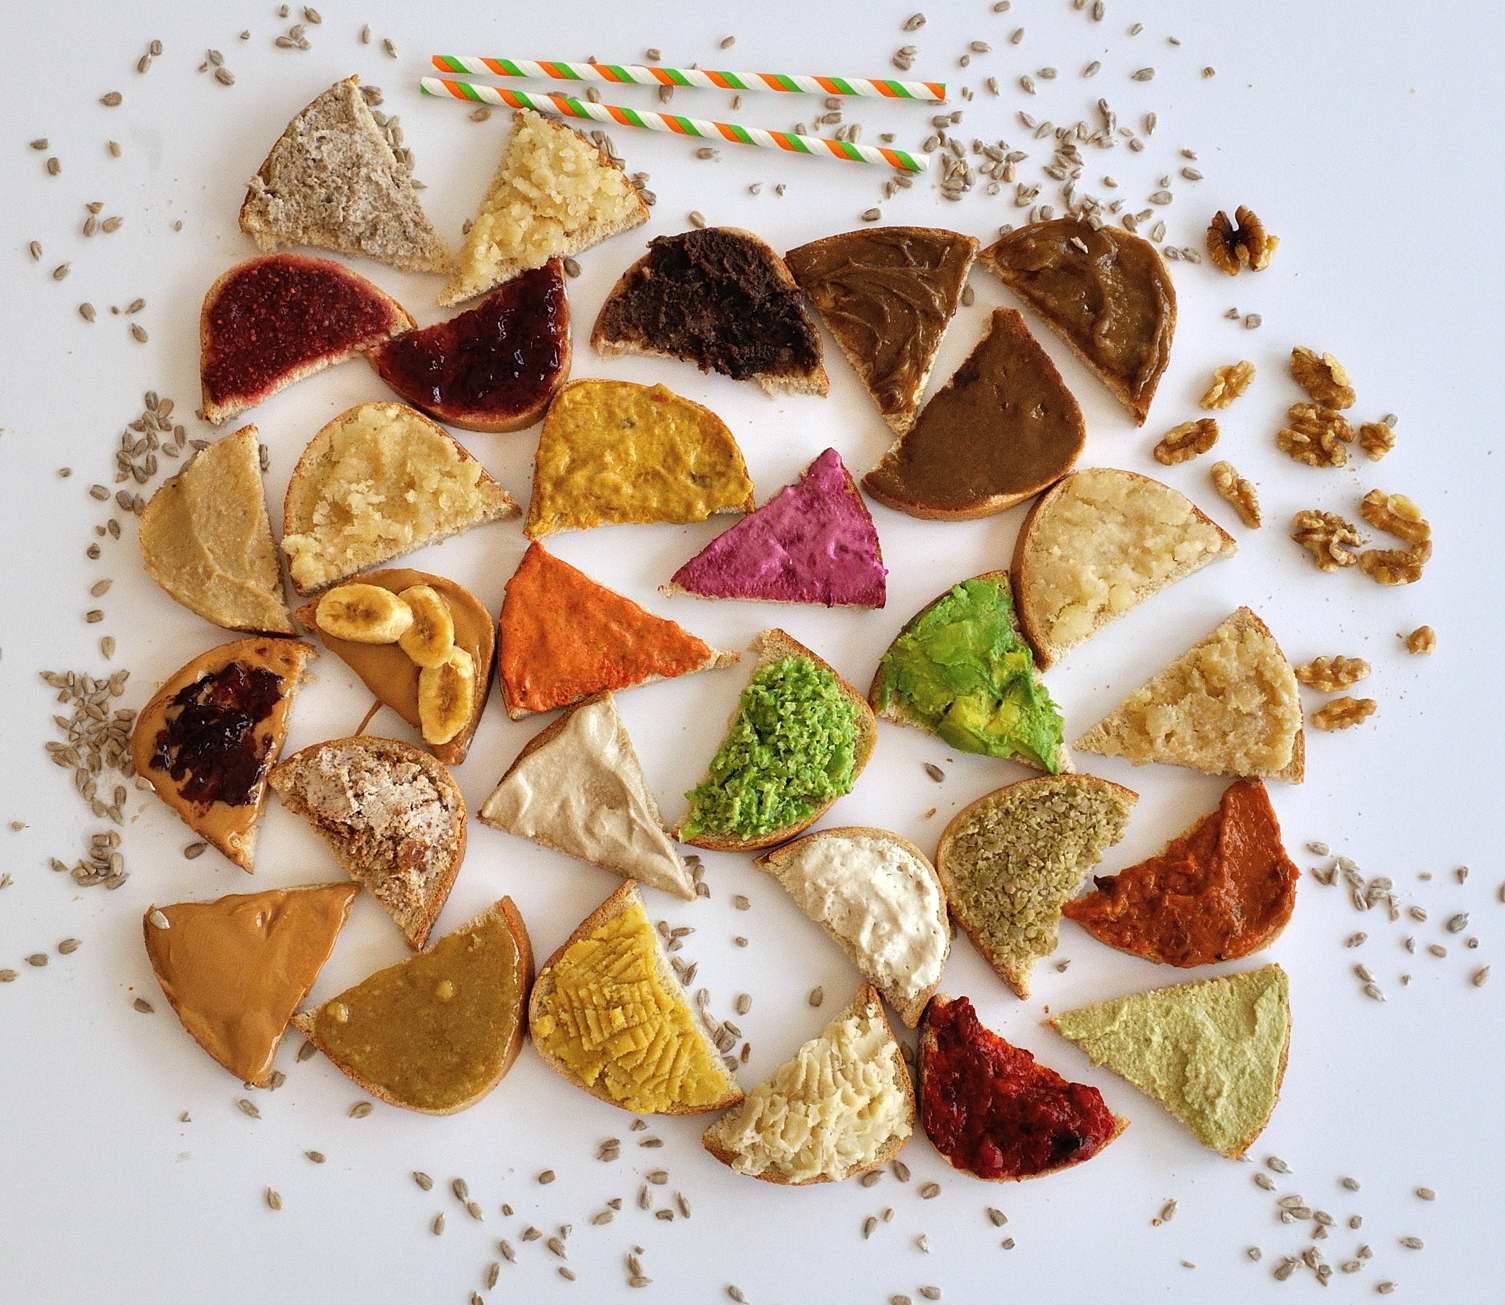
Regarding dips and spreads, I hope by now everyone agrees there are so many wonderful vegan options beyond butter and cheese, but if you need some inspiration, check out my post for 30 healthy homemade vegan sandwich spreads.
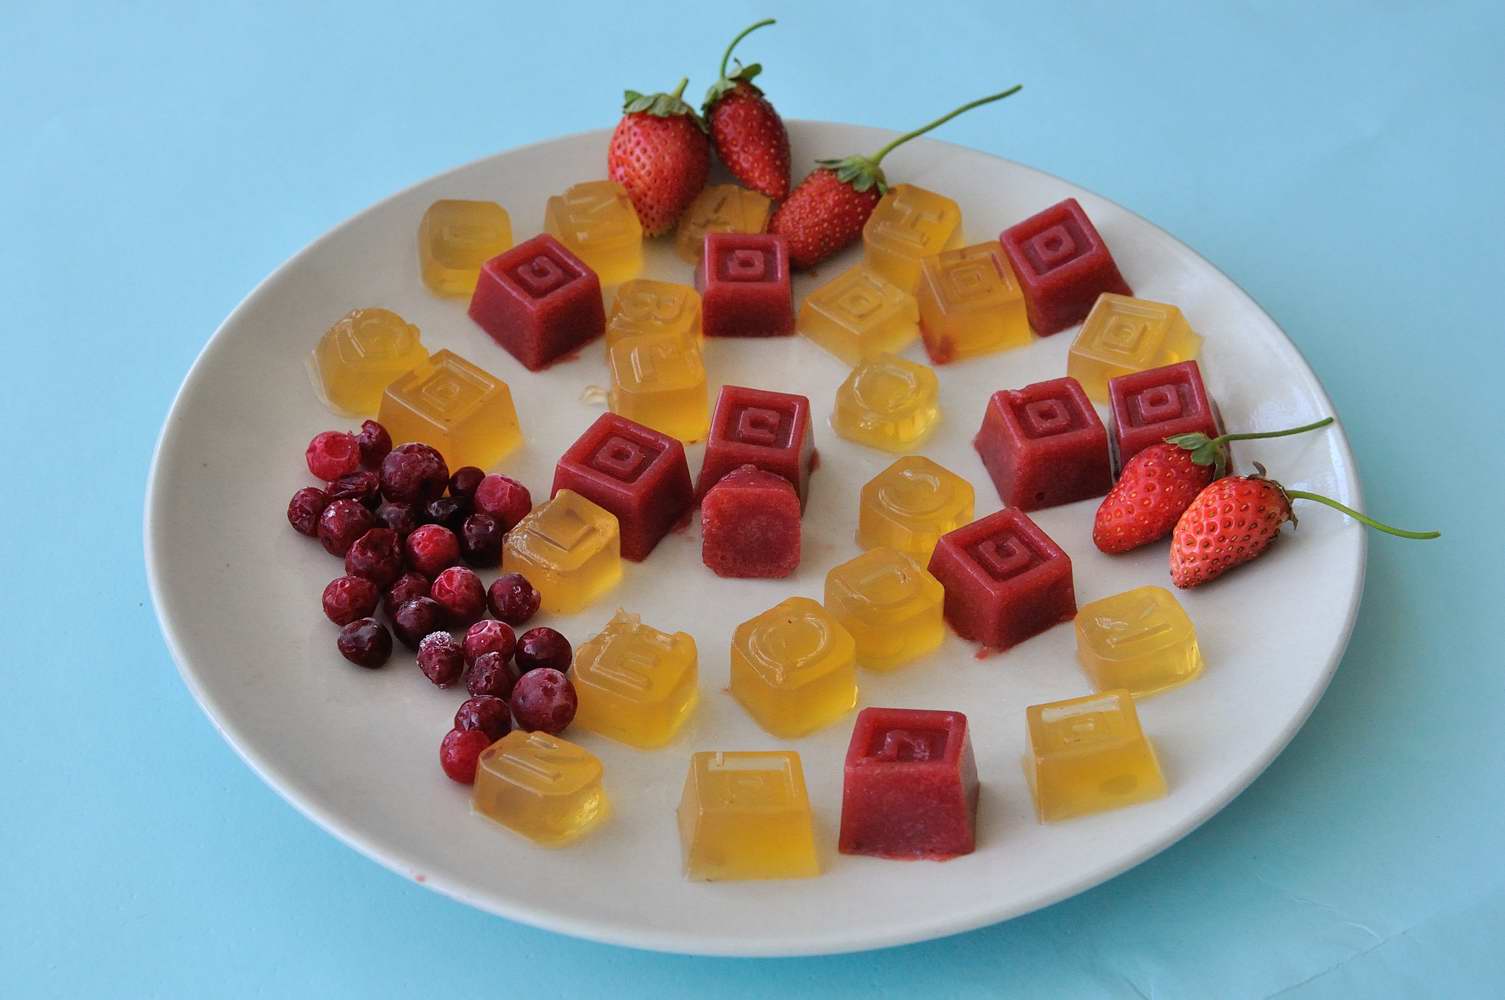
Jellow can also be made vegan. The plant based gelatin (which is made out of fish bones, yuck!) is agar-agar, which is obtained from algae. It has similar to gelatin thickening and gelling abilities. Yes, it is expensive, however with agar agar a little goes a long way, and you’d usually just use a teaspoon or 2 for any dish so a package should last long. I would use agar-agar instead of gelatin regardless of my vegan diet preferences, as it provides more vitamins and minerals than gelatin, and some sources claim that agar-agar also helps sooth the digestive system and can help us feel more full as it absorbs water. You can use it to make vegan Pannacotta, different “Jellow” shapes, puddings, and other creative stuff, check out here for more.
And one more thing that came to my mind as I’m wrapping up this post (currently), is that you can use Nori seaweed for patties and noodles dishes to obtain the desired fish flavor.
OK, closing for now, but this will be a dynamic list, as I will add any other tips I remember or new ones I learn, and I hope you will add yours in the comments, so that we can all enjoy the tribal knowledge.
P.S.
If you likes this and want to be updated with new recipes, Like VeganHightechMom on Facebook or register to get updates via email (Most Recommended Way!).
And share it with someone who’ll find it useful 🙂
Moran
2 תגובות
Love everything you make and write! Great , great blog!
Thanks Larisa!! 🙂